Easy Ways For Making Hand Embroidered Patches
Patches are fun and popular thanks to adding style to your favorite denim jacket or bag. DIY embroidered patches are easy to form.
For those of you who choose patterns supported how large you would like the patches to be. There is no rule for this, but smaller designs, like the weather during a fruit pattern, work well.
While there are four distinct methods for creating patches, you will find that you simply can mix and match a number of the techniques. Try experimenting with these four DIY. patch-making processes and create some embellishing embroidered patches in your next embroidery project.
Iron-On Patches
Iron-on patches are fast and straightforward to connect, which is usually helpful. Plus, you’ll give these patches as gifts. Just include some simple iron-on instructions.
For iron-on patches, you’ll need a pattern, two pieces of cloth, and two pieces of a paper-backed fusible web.
Instructions for Iron-On Patches
Choose a pattern, marking it with the transfer method that works best for the material you’re using (the patch during this tutorial was stitched on linen).
Stitch the planning, leaving room around the edges.
Cut a second piece of cloth to an identical size, also as two pieces of a paper-backed fusible web.
Iron one piece of fusible web to the non-embroidered piece of cloth. make certain to follow the manufacturer’s instructions and watch that you simply place your iron on the paper side. Also, you can check this site for more information
Iron-On Patches: Fuse Fabric to the Embroidered Piece
Peel the paper off the fusible web and place the material, web side down, on the rear of the embroidered fabric.
This provides your patch more stability and helps prevent the sides from fraying.
Iron-On Patches: Cut and Finish Patch
The fusible web helps prevent fraying, but you’ll also stitch a line of stitches near the sting to feature extra insurance against fraying. To form your patch, look more sort like a commercially made patch, use a whip stitch around the edge as shown within the pin patch tutorial below. If you’re attaching this to an item that’s washed regularly, you’ll want to attend to feature the road of sewing after it’s ironed in situ for extra security.
When you’re able to attach your iron-on patch, hold it in situ and iron the patch from the rear of the item you’re attaching it to. Confirm your iron is about on a high enough heat setting to urge through the layers.
Felt Sew-On Patches
It is also sewn in situ, so you recognize that your stitching won’t go anywhere. To make felt patches, you would like only the felt to embroider on, a marking method, and a thread to connect it with.
Instructions for Felt Sew-on Patches
To embroider on felt, mark the pattern with a water-soluble stabilizer or the paper method. Make certain to rearrange the embroidery in order that there’s ample space around the design for trimming the patch.
Embroider the pattern however you wish. Satin stitching looks great on small patches, but you’ll also stick with all outlines.
When the embroidery is completed, remove the markings. If you used the paper method, carefully tear off the paper.
Felt Sew-On Patches: Cutting
Finish the patch by cutting around the embroidery. You’ll loosely follow the form of the stitching as shown or cut out a daily shape, like a circle or hexagon.
But you’ll cut much closer. Just make certain that you simply don’t cut the stitches or trim the felt so close that the stitches fall out.
Self-Adhesive Patches
Want a permanent patch that you simply can attach sort of a sticker? This is often the tactic for you.
To make self-adhesive patches, you’ll need the material you’re stitching on, a bit of heavy stabilizer, and permanent peel-and-stick fabric adhesive.
Instructions for Self-Adhesive Patches
Transfer your pattern to any fabric that you simply like stitching on. Placing the planning on the bias of the material prevents excess fraying later.
Cut a bit of stiff, heavy stabilizer and layer it behind the material as you place it in your tambour. Stitch the pattern through both layers. Getting through the stabilizer can take effort, so make certain to use a robust needle.
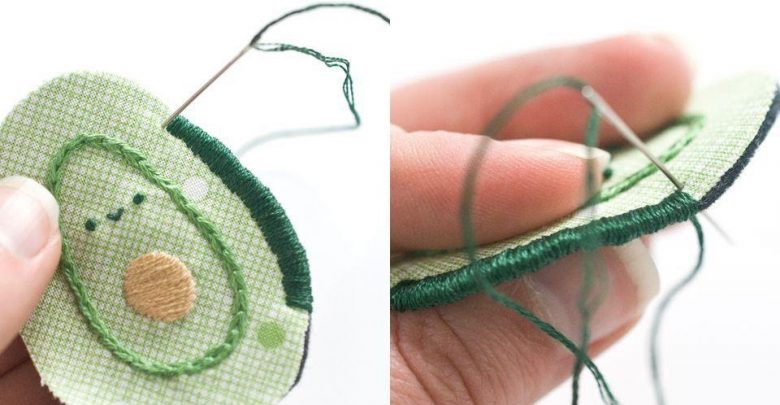
Self-Adhesive Patches: Cutting and Finishing Edges
Trim around the embroidered shape, leaving a touch of spice for stitching the sides. Stitch around the edges of the patch with a whip stitch or a stitch.
Self-Adhesive Patches: Attaching Adhesive
Use permanent peel and stick fabric adhesive on the rear of the patch. Cut one piece or strips to suit the patch within the stitched edges.
Conclusion
These are some of the most common and easy ways to make hand-embroidered patches. It doesn’t matter where you stand. If you have read the blog till the end, you will surely be able to create some astonishing hand-embroidered patches. If you have any questions about the topic or anything related to embroidery digitizing companies, feel free to reach out to us at Migdigitizing.
Thanks For Reading
More Read On Mashhap